expr:class='"loading" + data:blog.mobileClass'>

Sunday, March 20, 2016

Frozen Blueberry Bites


I LOVE Greek Yogurt…I LOVE blueberries…and I LOVE frozen stuff. :-)

So, that is why this recipe is the perfect pairing of two great tastes and even better... it is a a perfect 21 Day Fix approved snack!  Putting these little babies together is about as simple as it gets…although a tad time-consuming.


Here’s how to make your own Frozen Yogurt-Covered Blueberry Bites:

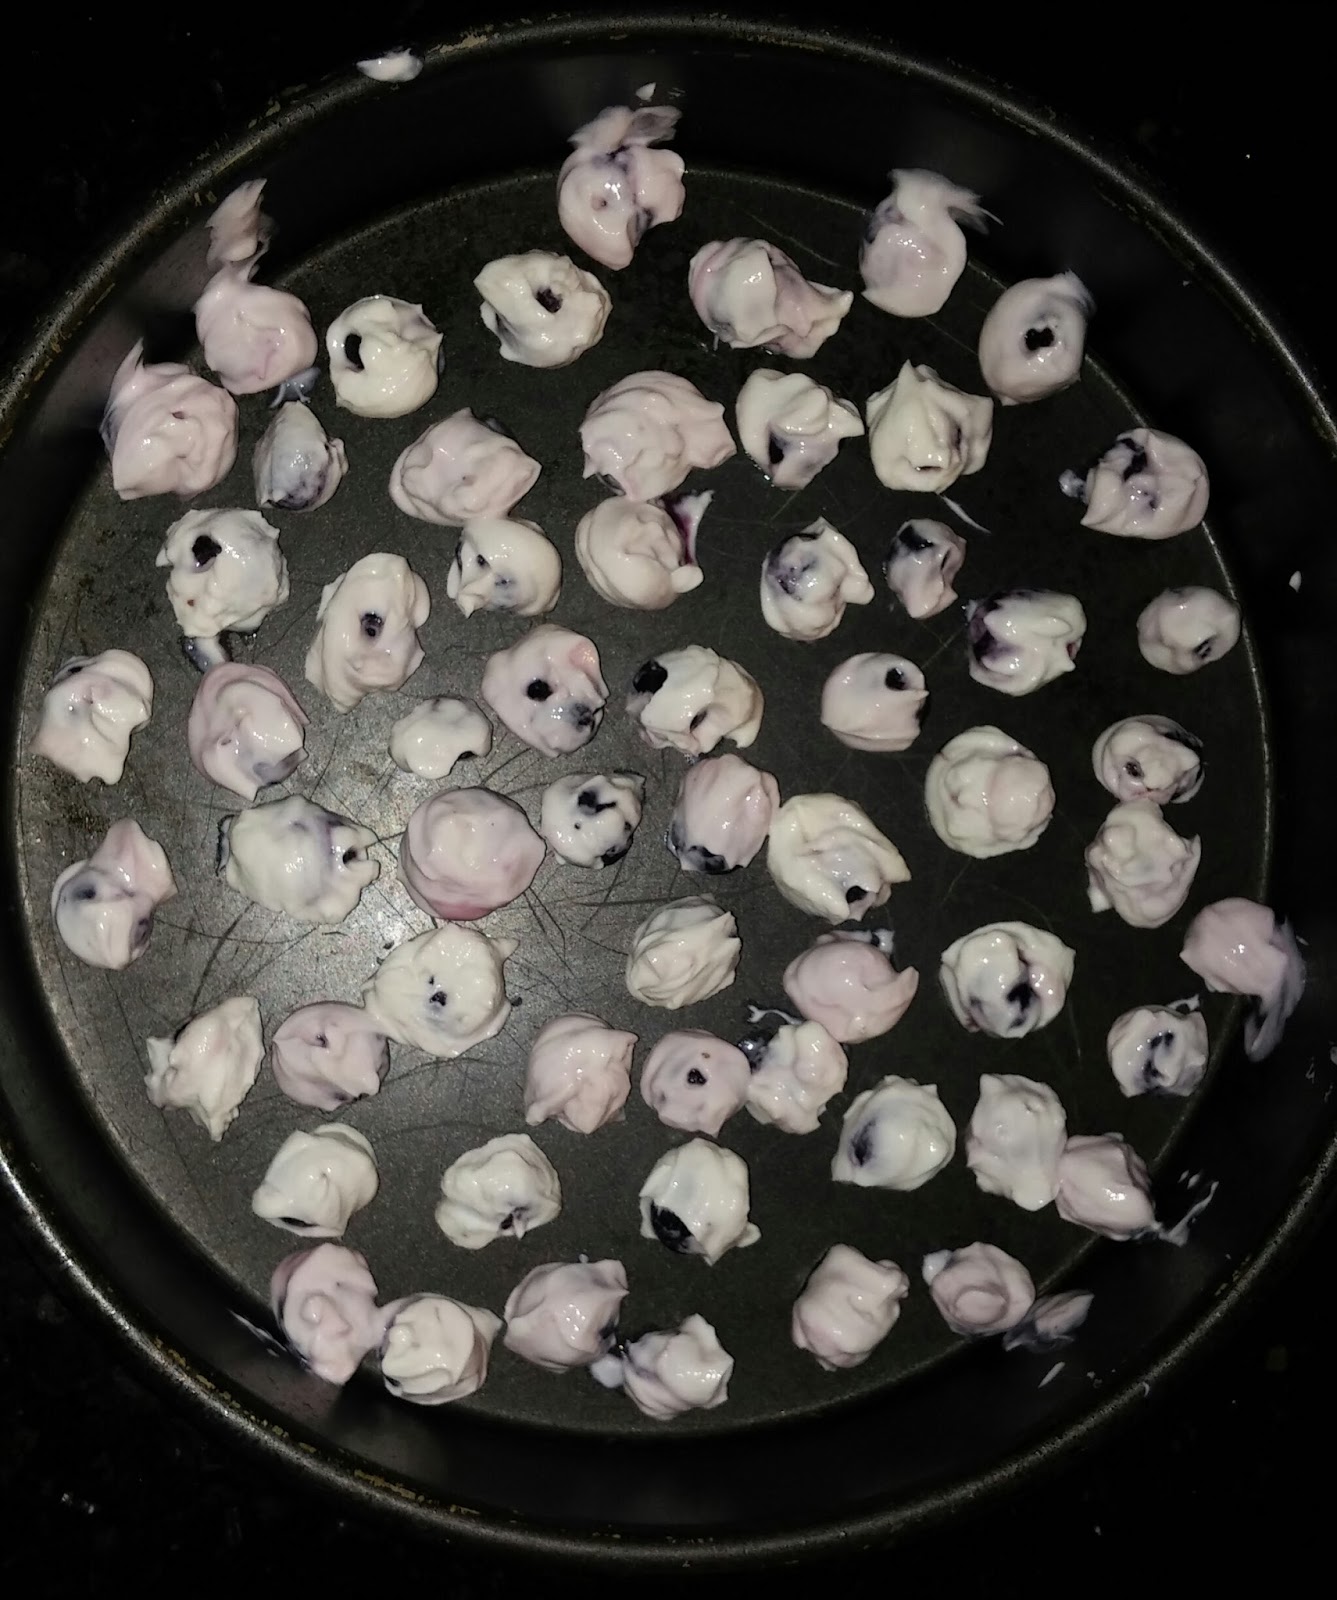
Stick a berry with a bamboo skewer (a toothpick would work too) and dip/swirl it in the yogurt. Then ease it off the end of the skewer and onto a cookie sheet. It’s easier to do this if you just barely stick the berry onto the skewer.


Keep dipping and swirling until all of the blueberries are gone or you run out of yogurt …and put them in the freezer. I couldn’t believe how FAST these things froze! Literally like 10 or 15 minutes. But I would recommend leaving them in for an hour initially and then pop them off the cookie sheet and into a plastic container or baggie.


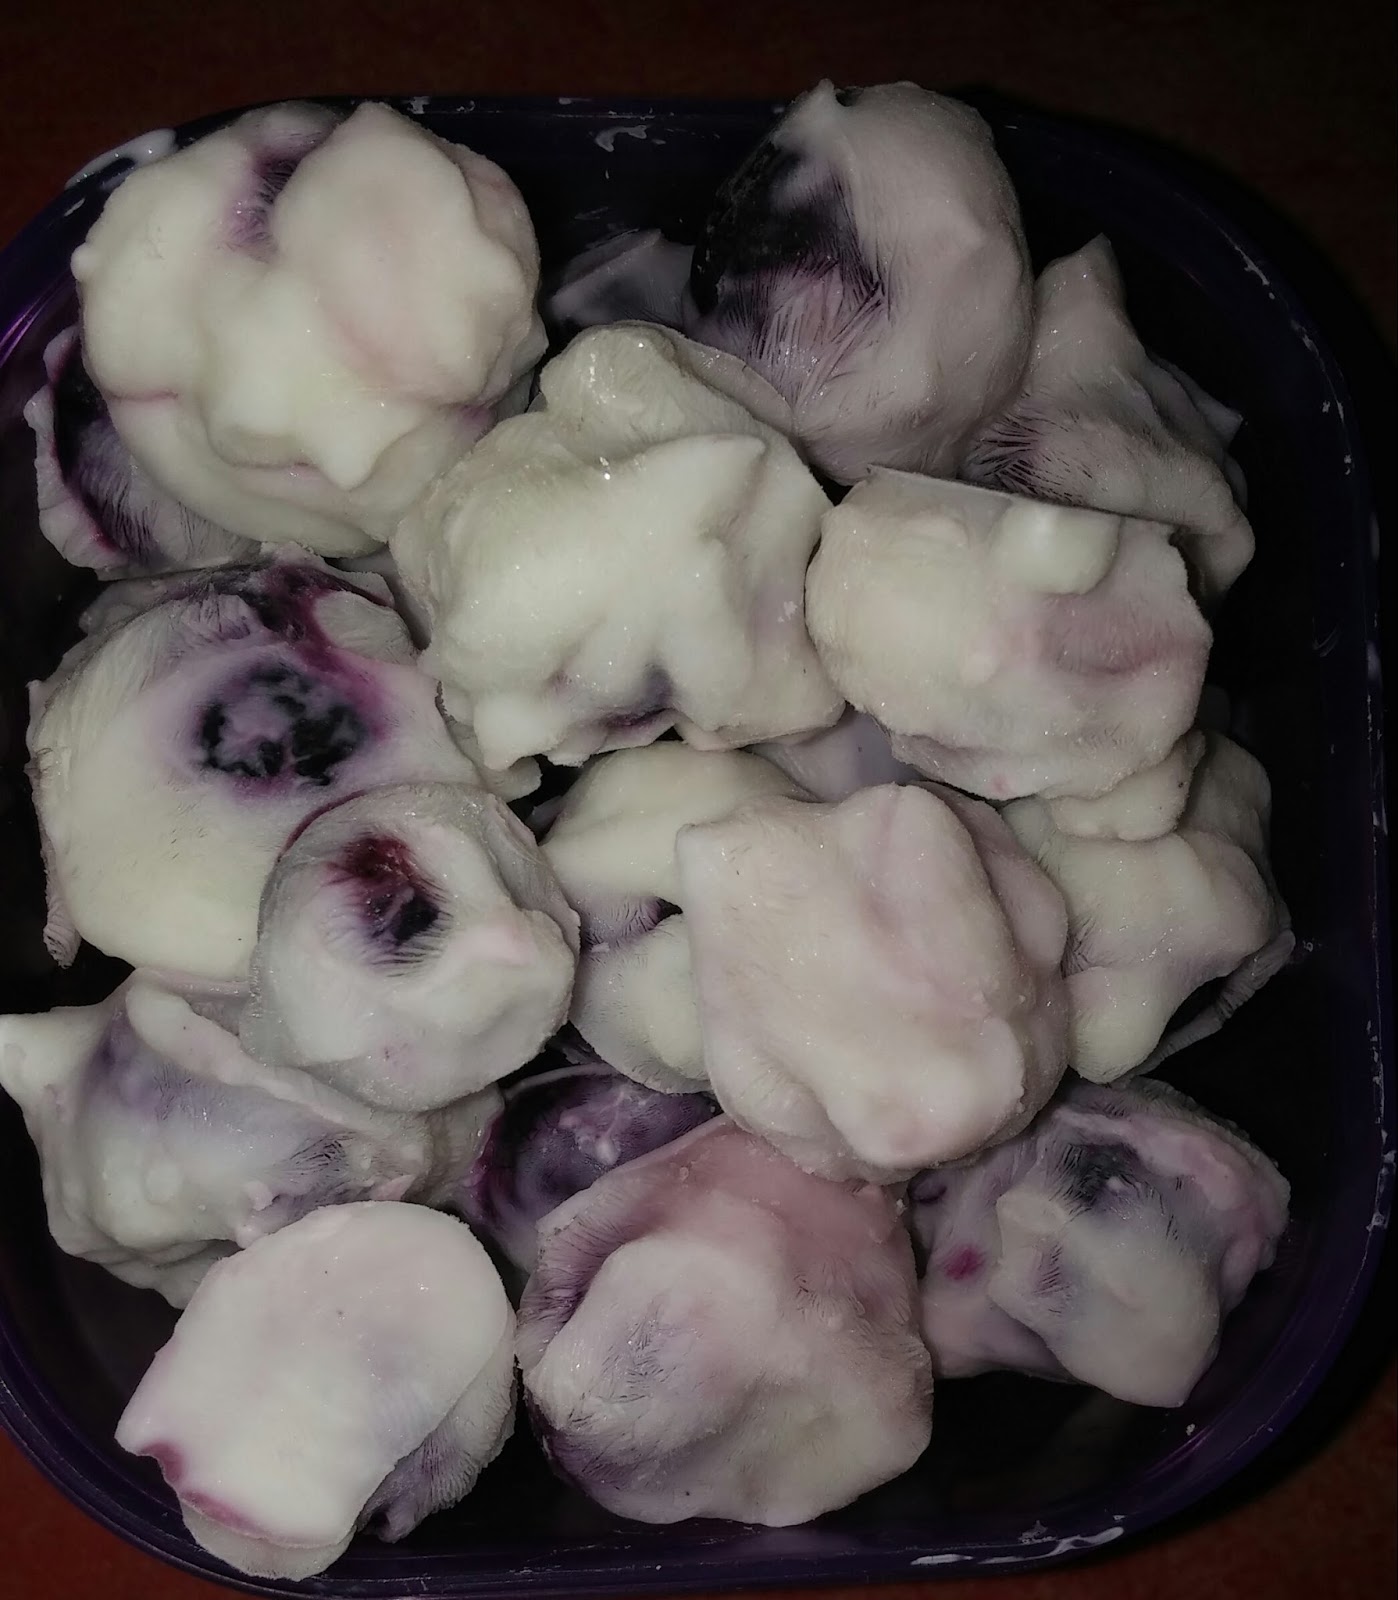
Look how many blueberry bites I was able to make with one little carton of blueberries!


Ohhhh…and the taste!! I can only describe them as cold and creamy with a surprise tart and juicy center! Soooooo good!

Definitely MY kind of treat!  I  hope it will be yours too! :-)


21 Day Fix Container count: 1 red, 1 purple


Learn how I lost 25 pounds in 2 months!  Click below
to register for my FREE five day sneak peek group where I will explain every step of how I lost 25 pounds using the 21 Day Fix program AND I will share ALL of the secrets that I learned along the way that have proven to be game changers for me!   I will break this process down for you step by step so that you can easily incorporate the pieces into your own daily life to reach YOUR goals!

Learn More


Do you want to join my next FREE fun fitness and clean eating group??? Just fill out the below form:


Garlic Parmesan Roasted Broccoli Bites

Garlic Parmesan Roasted Broccoli Bites


These roasted broccoli florets come together with just 5 min prep, tossed in Parmesan-garlic goodness. Plus, it’s the perfect and easiest side dish to any meal!


Every bite was so worth it...So garlicky... And just so crisp and crunchy! YUM!!


Prep Time: 5 minutes
Cook Time: 10 minutes

Total Time: 15 minute


Ingredients
  • 24 ounces broccoli florets*
  • 3 tablespoons olive oil
  • 4 cloves garlic, minced
  • Kosher salt and freshly ground black pepper
  • 1/4 cup grated Parmesan
  • Juice of 1 lemon


Instructions
  • Preheat oven to 425 degrees F. Lightly oil a baking sheet or coat with nonstick spray.
  • Place broccoli florets in a single layer onto the prepared baking sheet. Add olive oil and garlic; season with salt and pepper, to taste. Gently toss to combine.
  • Place into oven and bake for 10-12 minutes, or until tender.
  • Serve immediately, sprinkled with Parmesan and lemon juice.


Notes: *24 ounces broccoli florets is equal to about 5 cups.

Do you want to join my next FREE fun fitness and clean eating group? Just fill out the below form:


Wednesday, March 9, 2016

Grocery Shopping Tips

Grocery Shopping Tips


#1 DON’T SHOP HUNGRY

Make sure you eat a balanced snack or meal prior to venturing out to the grocery store. This is critically important if you are stopping to shop following work. Pack extra snacks, bring them to work and eat them toward the end of your day or on your way to the store. If you find yourself at the store and you are hungry but did not prepare a snack, go to the pre-cut veggies and grab something healthy like cut cucumbers. You can also ask for a sample of sliced turkey when you are at the deli or order a few slices. This will fill you up with smart choices, so you will stick to buying what you need!

# 2 HAVE A PLAN

Prior to going to the grocery store, take the time to surf the web (Pinterest), read recipe books or review your own recipe file to plan out your meals. This way you will know the ingredients that you will need before heading out to the store. Instead of mindlessly shopping and ending up with items that don’t serve you well, you will be mindful and aware of what you are buying. Supermarkets and manufacturers know how to market merchandise to consumers, especially hungry ones that shop without a plan!

# 3 SHOP WITH A LIST

When you have a plan and create a list, you will be less vulnerable to give in to temptation as you go up and down the aisles. Make a commitment to stick to your list. When you take the time to make a shopping list from a meal plan that also includes snacks, you will be more likely to stay the course of your good intentions to eat well.


#4 SHOP THE PERIPHERY

Shop the perimeter of the store first. This is where you will typically find the fruits and veggies as well as the dairy, meat, chicken and fish departments. Within the inner aisles of the store you will mostly find packaged and processed foods. Limit your time here!

#5 THINK ANCESTRALLY

Stop and ask yourself while shopping, would my grandparents or ancestors have had access to this food 100 plus years ago? Our ancestors did not have access to processed foods long ago. Consider eating whole, fresh, natural and unprocessed foods as much as possible... your body will LOVE you for it!
.
#6 CHOOSE A RAINBOW OF COLORS & WHOLE GRAINS

Choose romaine, kale and spinach over iceberg lettuce. Buy sweet potatoes instead of white potatoes. Consume brown rice or wild rice instead of white rice. Choose more vibrant colored vegetables instead of the pale variety. Colorful vegetables are packed with more nutrients. Purchase whole grain bread or sprouted breads along with brown rice and whole wheat pasta as they contain more fiber. They also help to balance your blood sugar levels, which allow you to stay fuller longer.


#7 SAY GOODBYE TO LIQUID CARBS

Do not put sugary drinks into your cart! Say goodbye to sodas, sports drinks, and fruit juices. These are liquid carbs and are made up of empty calories! They cause your blood sugar to rise significantly. Purchase sparkling water and cut up lemons and limes instead.  You might consider purchasing a water infusion pitcher so you can add berries, watermelon, mint or even cucumber, among other combinations to flavor the water naturally. Check out my previous blog post Detox Water Bar for some really great water recipes to change things up a bit! Buy herbal and green teas and make pitchers of iced tea.  There are some really great flavored green tea varieties out there! These are tasty alternatives to sweetened drinks! Try to avoid (if possible) drinks that contain artificial sweeteners like Crystal Light with aspartame.  There are some varieties that are made with Stevia now that are a much healthier option.


#8 PLAN FOR “REAL FOOD” SNACKS

Just as you create a list and meal plan for your week, do the same with balanced healthy snacks. If you eat 5 or 6 smaller portioned meals or snacks each day, your blood sugar will be more stable and you’ll feel full longer. 

#9 GIVE INTO “ONE” CRAVING

Eating healthy for the long-term is about balance. Cutting out foods indefinitely doesn’t work for every one. It’s okay to give in to some of our cravings. If we don’t, we may choose to binge or give up our lifestyle changes when we can’t be perfect. Be smart about your indulgences. If you love ice cream, don’t buy a pint of Ben and Jerry’s, buy the small overpriced mini-pint size and have that available to eat once or twice a week.


#10 READ NUTRITION LABELS

Think about purchasing single ingredient foods. For example, broccoli and apples are single ingredient foods. Avoid processed foods that contain additives, preservatives, trans fats, etc.  Adopt the rule: If you can’t pronounce it, don’t eat it! Attempt to stick with items that have 5 ingredients or less and limit foods that are in a box, bag or can. Just because the package says “low fat” or “low calorie” or “good source of”  …. Does not mean that it is healthy!


Would you like to join my next FREE healthy eating fitness challenge?  Just fill out the below form and let's get started!


Would you like to learn more about Shakeology?


Tuesday, March 8, 2016

Hammer and Chisel - Frequently Asked Questions

Frequently Asked Questions


What is The Master's Hammer and Chisel?

An innovative resistance-training system that includes all three phases of muscle sculpting—known as SSP Training—
to rapidly build, chisel, and refine a masterpiece physique in just 60 days.

• Sculpt your ultimate physique with 12 brand-new workouts that incorporate the three phases of SSP Training— Stabilization, Strength, and Power—that are essential to building a powerful, perfectly defined body.

• A comprehensive program from seasoned trainers and award-winning fitness competitors, Sagi Kalev and Autumn Calabrese.

• Includes options to adapt certain exercises if you have limited access to equipment.

• Includes a modifier who demonstrates some moves at a lower intensity.

• Fuel your body for demanding workouts and achieve your best results with a straightforward portion-control nutrition plan that you can customize to meet your goals—whether you want to lean out, sculpt and maintain what you’ve got, or build muscle.


Who is the target audience?

• Men and women looking for a comprehensive resistance-training or muscle-sculpting program.

• Those who enjoy Body Beast®, 21 Day Fix®, or 21 Day Fix EXTREME®.

• Those who like the motivating styles and proven training methods of trainers Sagi Kalev and Autumn Calabrese.

• Those who crave a simple, flexible nutrition plan to help them reach their unique goals.

What makes The Master’s Hammer and Chisel program so effective?

• The Master’s Hammer and Chisel is built on the three phases of SSP Training—Stabilization, Strength, and Power. Other programs only focus on one or two phases, which might give you decent results. But The Master’s Hammer and Chisel program incorporates all three methods to help you relentlessly chip away fat and carve every muscle for a strong, visually stunning body in 60 days.

• The program combines the expertise and proven training techniques of two seasoned trainers who’ve spent decades acquiring the tools, skills, and experience needed to transform your body into a masterpiece—fast.


• Co-creator Sagi Kalev was crowned Mr. Israel–twice–and is a Master Professional Personal Trainer, IFBB Pro, member of the IFBB Propta Hall of Fame, Certified Nutrition Specialist, and Functional Diagnostic Nutritionist.

• Co-creator Autumn Calabrese is a celebrity trainer, best-selling author, and working mom who has held certifications from the National Academy of Sports Medicine (NASM) and the American Fitness Professionals & Associates (AFPA), and has competed at the national level in various bikini competitions.


How does The Master’s Hammer and Chisel program differ from Body Beast and 21 Day Fix EXTREME?

• Sagi Kalev and Autumn Calabrese combined their own effective body-sculpting techniques into one comprehensive resistance-training program.

• Body Beast is a bodybuilding program that focuses on muscular hypertrophy. The Master’s Hammer and Chisel includes aspects of bodybuilding, but also focuses on improving endurance, power, agility, strength, balance,
and range of motion to sculpt a powerful, defined physique.

• 21 Day Fix EXTREME is a shorter, goal-specific program, whereas The Master’s Hammer and Chisel is a full 60-day program with slightly longer workouts. 21 Day Fix EXTREME focuses on getting you shredded in the
shortest time possible, while The Master’s Hammer and Chisel also helps you improve other aspects of your fitness, such as muscular endurance, power, strength, and agility. It’s a whole new approach to helping you
achieve a strong and chiseled body.

What equipment requirements are there?

• A few dumbbells of various weights appropriate to your strength and fitness level.

• A bench or stability ball.

• A chin-up bar or a resistance band and a door attachment (you can just hinge it around the door knob without using an official "door attachment").

What are the unique benefits?

• A strong, chiseled, perfectly defined body.

• Improved strength, power, cardiovascular endurance, balance, and agility.

• Incredible definition that you might not have been able to achieve before.

• The flexibility to lean out, sculpt and maintain what you have, or build muscle, depending on your unique goals.

What’s included?

• 12 workouts on 6 DVDs that rapidly build, chisel, and refine your body using SSP Training.

• A set of 7 portion-control containers and a Shakeology® shaker cup to help you master the art of nutrition—and sculpt your ultimate physique.

• The Master’s Hammer and Chisel Program and Nutrition Guide, with your straightforward eating plan, easy-to-make recipes, and Sagi and Autumn’s expert tips for getting the most out of your workouts.

• Quick-Start Guide lays out your 3-step blueprint for building the body you’ve always wanted.

• 60-Day Calendar that shows you which workout to do each day for efficient and effective training.

• PLUS 2 FREE BONUS WORKOUTS
10 Min Ab Hammer: Carve definition into your core while strengthening your entire ab complex AND
10 Min Ab Chisel: This core-crusher will transform your midsection, without ever getting on the floor.

***EXCLUSIVE! When you purchase this program through me with me as your coach, you will get the FREE bonus workout, The Master’s Cardio!***

When Sagi and Autumn want tough, fat-chiseling cardio, The Master’s Cardio DVD includes their go-to moves.  Short, but intense, this workout boosts aerobic capacity, power, and muscular endurance—without impacting your
lean-muscle gains.

Can I stream The Master’s Hammer and Chisel workouts?

Yes! If you purchase The Master’s Hammer and Chisel and become a Premium Team Beachbody® Club member, you’ll get unlimited access to Beachbody® On Demand, where you can stream The Master’s Hammer and Chisel and hundreds of proven Beachbody workouts via any desktop, laptop, tablet, TV, or mobile device—wherever you have an internet connection. Just look for “Purchased Programs” on Beachbody On Demand to access The Master’s Hammer and Chisel.

Related Posts: My Journey with Hammer and Chisel: Overview

Would you like to learn more about Shakeology??


Do you want to get chiseled with me?? 

Fill out the form below and let's get started!!

Sunday, March 6, 2016

Hammer and Chisel Journey - Day 26: ISO Speed Hammer

Day 26 - ISO Speed Hammer

uh... can I have her abs??


Please see my previous blog post from Hammer and Chisel - Day 5 for a full description of the workout to include pictures of some of the moves.

We have not seen this workout since Day 5 and it is now Day 26! One thing about this program is that you never get bored doing the same old workouts over and over!  There are so many different workouts that I have a hard time keeping them all straight and remembering which one is which!  I would say that this Hammer and Chisel program really defines the term muscle confusion!  

This workout really BURNS the muscles and works them to fatigue which induces change.  It really goes back to the basics utilizing push ups, squats, lunges, lateral raises, bicep curls, tricep kickbacks (this is not a full list), but you get my point. Sagi really covers all the basics with this workout and works all of your muscle groups.  This workout is very challenging, but in a good way! I really like this one!


Hammer and Chisel Journey - Day 15: Total Body Hammer

Day 15 - Total Body Hammer

...and this workout will REALLY leave you feeling sore!


Please see my previous blog post Hammer and Chisel - Day 7 for a full description of this workout to include pictures of the moves. 

I used the same weight amount that I used on Day 7, so there is nothing new to report today regarding the workout itself. I will say that I am REALLY sore! I can't believe how sore that I am.... oh, and did I mention that I am feeling VERY sore???  Oh, and satisfied!  I will admit that it is a satisfying feeling for sure!

OK... see you tomorrow for Hammer and Chisel- Day 16 (if I can move, that is!) 

Hammer and Chisel Journey - Day 49: Total Body Hammer

Day 49 - Total Body Hammer

Please see my previous blog post Hammer and Chisel - Day 35 for a full description of this workout to include pictures and video clips of the moves.

...And this workout will definitely make you sweat!!


I don't think that I did a good job telling you how much weight that I was using on previous blog posts for this workout, so I will outline below the weight that I was using and try to highlight increase in weight as appropriate.


Round 1: 

Bench Press –  I used the stability ball for this – but a simple bench press! I used 25 pound dumbbells. (a significant increase from the first time that I did this workout using 12 pound dumbbells)  This was heavy for me... 20 pounds probably would have been a better choice!

Squat – a simple squat with knees shoulder distance apart. This move gets significantly harder with the weight over time. I used 25 pound dumbbells.


Reverse Grip Row – Bend at the waist and pull towards you, focusing on your back. I used 15 pound dumbbells for this move.

Round 2:


Incline Fly  – Same as the bench press but you do a fly move on an incline...so that you work your upper chest more. I did this on the stability ball using 15 pound dumbbells. (an increase from 10 and 12 pound dumbbells)

Reverse Lunge– Step back lunges. Round one is the right leg, round 2 is the left leg. I used 25 pound dumbbells.

Wide Pull-Up – HARD!!!. I am still using the resistance band attached to the door for this move.  My husband uses the pull up bar.

Round 3: 

Military Press –  Shoulder workout – I performed this seated on the stability ball using 10 pound dumbbells (an increase from 8 pound dumbbells).

Split Squat – One leg up on a chair (couch for me) and then you squat with the other leg. Round 1 is the right leg, and round 2 is the left leg. I used 25 pound dumbbells for this move.

Post Delt Fly – This is a one-armed deltoid - just swing your arm up to the side from a bent over position leaning on the ball. This one is a lot harder than it seems and really becomes very difficult by the end.  I used a 10 pound dumbbell, an increase from an 8 pound dumbbell.


Total Body Hammer Review & Thoughts: 


 This is definitely the most “classic weight lifting” round of the program.  I really enjoy it and I always work up a crazy sweat – the rest period between moves is very short! I have been able to increase my weights a little bit since the last time that I completed this workout, so I know that I am getting stronger! Be sure to track your weights and track your progress! I wish that I was doing a better job writing my weights down... so learn from my mistakes on this! :)


Hammer and Chisel Journey - Day 51: MAX Hammer Strength

Day 51 - MAX Hammer Strength

...and this workout will surely make you sweat!!


Please see my previous blog post Hammer and Chisel Day- 9 for a full description of this workout. 

I can tell that I have gotten much stronger as evidenced by the fact that I can do push ups for a full minute without having to go down on my knees! This is new for me! When we started this journey, I struggled to do 30 seconds before dropping to my knees! 

The moves are as follows:   (body weight –> 60 secs and weighted –> 8 reps)


  • Reverse Lunge without weight followed by weighted Reverse Lunge (left then right) for eight reps. I used 25 pound dumbbells. My 11yo son who joined me today used 12 pound dumbbells
  • Push-ups for one minute followed by Chest Press (Bench Press) (on ball or bench or floor even) I used 25 pound dumbbells and performed it on the stability ball. My son used 12 pound dumbbells.
  • Body-weight squats for one minute followed by shoulder squats (dumbbells on shoulders) I used 25 pound dumbbells. My son used 12 pound dumbbells.
  • Pull-ups for one minute follwed by Lateral pullovers on the stability ball (one dumbbell) I used one 25 pound dumbbell. My son used a 12 pound dumbbell. I did the pull ups using a resistance band attached to the door.  My son used the pull up bar and was able to do 12 pull ups! :) *On a side note, he has been chosen by the school to represent the 6th grade in their First in Fitness event where he be participating in the triathlon event. He will run one mile, do sit ups for one minute, and as many pull ups as he can do! I am very proud of him! This will take place in April.
  • Good mornings for one minute followed by dead-lifts. I used 25 pound dumbbells and my son used 12 pound dumbbell.
  • Chin-ups for one minute followed by one arm row (Right/Left) for eight reps. I used a 15 pound dumbbell. My son used an 8 pound dumbbell. Again, I did use the resistance band attached to the door for the chin ups.
  • Low sumo squat for one minute (you remain in the squat position throughout the entire minute and never fully stand all of the way up) followed by weighted sumo squats (1 dumbbell) I used a 25 pound dumbbell. My son used a 12 pound dumbbell.
  • Resistance Band military press for one minute followed by seated military press. I used 12 pound dumbbells (an increase from 10 pound dumbbells). My son used 8 pound dumbbells.
  • Bulgarian split squat for one minute followed by single leg step up  (Right then left after completing both moves) The single leg step up is REALLY hard by this point! I used a 10 pound dumbbell. My son did it without weights.
  • Ledge calf raises on edge of bench or step (or on the floor) for one minute followed by seated calf raise (with dumbbells on thighs) I used 25 pound dumbbells. My son used 12 pound dumbbells. 


I enjoy this workout... It is a good workout, gets the heart going by using the large muscle groups with all of the squats, and definitely leaves you feeling worked!  And..... I am pretty sure that I am going to be sore, lol! I feel like I have been sore every day for the last 51 days, lol.  However, I actually have started using Beachbody's Recovery Formula and I can tell a difference. I think that I would be much more sore without it.  I started using the Recovery about half-way through this program, and I can definitely tell a difference!

See you tomorrow for Hammer and Chisel - Day 52! 

Hammer and Chisel Journey - Day 17: Max Hammer Strength

Day 17 - Max Hammer Strength


Please see my previous blog post Hammer and Chisel - Day 9 for a full review of this workout by Sagi Kalev. Nothing has really changed for me with regard to this workout from Day 9 to Day 17.  I used the same amount of weight for the exercises.  I definitely feel as though my legs are getting stronger, but don't be fooled... this workout is still a BEAST!  The above picture is a good one to represent this workout because this one will definitely leave you SORE afterwards! The heavy lifting for eight reps is very effective, I can attest to that! 

If we could really just to go Costco for a body like Sagi's versus working hard for 30-40 mins EVERY day... I would do it in a heart beat! Ha! The Costco reference is an inside joke... once you have done the workout, you will get it! 

See you tomorrow for Hammer and Chisel - Day 18!

Hammer and Chisel Journey - Day 31: Chisel Balance

Day 31 - Chisel Balance

I am so disappointed and sad to report that I missed today's workout!! I did not get it done. Life and my children's extracurricular activities got in the way. I regret that I did not plan my day better to prevent missing a workout.


So, as this picture depicts.... it really does no good to make excuses! And there really are no good excuses anyway! It comes down to one thing... making a decision to commit to something and sticking to it!  I should have planned better to make time in my busy day to exercise.  My exercise time is my "me" time... so it is definitely missed when I skip a workout!  

In 30 days, this has been the first workout that I have missed and I am committed to finish STRONG to the end without missing another workout!  Hopefully you readers (if there are any of you out there) will keep me accountable to this proclamation!

OK... So after an "extra" day of rest, I will see you tomorrow for Hammer and Chisel - Day 33! 

Hammer and Chisel Journey - Day 13: Chisel Balance

Day 13 - Chisel Balance

Please see my previous blog post from Hammer and Chisel - Day 1 for a complete description and outline of this workout to include pictures of the moves, etc.  


Nothing really has changed for me since Day 1 with regard to this workout.  It is still HARD and it still requires a lot of BALANCE.  Of all of the workouts performed thus far, this one is probably my least favorite probably because it exposes my weaknesses.  This is a very challenging workout!  It really induces muscle burn and it is quite tough cardiovascularly also! It is not described as a cardio workout, but it packs a pretty good cardio punch in my opinion! 

The hardest move is still the split squat jumps... my heart was really racing by the time I completed one side and I still had to do the other side while being completely out of breath with no time to recover!!  However, I don't let myself press pause... but this would certainly be a spot in the workout where I could certainly understand if someone did press pause.  Certainly not as hard cardiovascularly, but the pistol squat/upright row move is probably the next hardest move in that it requires tremendous balance and causes the most significant muscle burn that I have experienced in a LONG time. My husband couldn't finish the set! And I had to touch my leg down for a few seconds rest several times because of the BURN!!  

OK... that's a wrap!  See you tomorrow for Hammer and Chisel - Day 14! 


How to Take Accurate Before and After Measurements

How to Take Accurate Before and After Measurements


I know.... you are standing there holding the measuring tape and wondering... where EXACTLY am I supposed to measure?  I can't tell for sure just by looking at this picture... and I want to get it right!  Believe me, I feel your pain! Relax... it is actually not that hard.


WHAT YOU NEED TO TAKE YOUR MEASUREMENTS

Don’t worry…taking body part measurements is super easy. All you need is a flexible tape measure (fabric, not metal!) and a method to record and track your results like one of my above measurement trackers. You can find fabric tape measures at almost any art & craft or fabric store near you.

WHERE TO TAKE YOUR MEASUREMENTS
When taking your measurements, you need to measure with the same tightness and same spot each and every time – otherwise, you are not going to get accurate readings. The measuring tape should neither be too tight nor too loose. If skin is starting to bulge out from over and under the tape measure, you are measuring too tight, and if it’s moving around freely, you don’t have it tight enough.

Here are the body parts you should always measure and how to measure them properly:
  • Neck – Measure around the smallest part of your neck.
  • Chest– Measure around the fullest part of your bust, under your armpits and around your shoulder blades.
  • Arms – Measure around the largest part of your arms (flexed or not flexed, just make sure to do it the same every week.)
  • Waist – Measure around the smallest part of your waist, if you don’t have a pronounced wasistline and you’re fairly straight, measure at the belly button.
  • Hips – Measure around the widest portion of your hips.
  • Thighs –  Measure the circumference of the the fullest part of your thigh, usually about three inches from your crotch.
  • Calves – Measure around the largest part of your calf (flexed or not flexed, just do it the same each time).


WHY I LIKE BODY PART MEASUREMENTS OVER THE SCALE
Muscle weighs more than fat and does not take up as much space, which means you could lose a ton of fat and not lose much weight on the scale if you’ve been putting on lean muscle mass. What commonly happens when people begin a new fitness program is that they lose fat and replace it with muscle. This means the scale could remain the same even though you’ve lost five pounds of fat and replaced it with five pounds of muscle. A good thing to always remember is this: losing inches is a better tracker of success than losing a ton of weight.  Taking your body part measurements will let you know if you are building muscle and losing fat, while a scale is just not smart enough to figure that out!

Saturday, March 5, 2016

Detox Water Bar - Health Benefits and Recipes

Detox Water Bar - Health Benefits and Recipes

Are you trying to lose weight, improve your digestive health, fight inflammation and boost your immune system? Drinking a tall glass of detox water (or two to three) a day can help you do just that!

Do you get tired of drinking plain old water all of the time and you need a way to change things up??  Why not give yourself some extra flavor and add amazing health benefits all at the same time?! Sounds too good to be true, huh??

Regular H2O can easily be transformed into delicious detox water by adding fruits, vegetables and herbs. As the ingredients soak, powerful nutrients will release into the water. While all detox water recipes aim to flush harmful toxins from the body, certain ingredients add additional benefits.

Here is a breakdown of health benefits of common ingredients used to make detox water:

Lemon & Lime
  • Flushes toxins
  • Aids digestion
  • Boosts the immune system
  • Rejuvenates skin
Cucumber
  • Flushes toxins
  • Fights inflammation
  • Aids digestion
Orange
  • Flushes toxins
  • Boosts the immune system
Grapefruit
  • Flushes toxins
  • Aids weight loss
  • Improves digestion
  • High in antioxidants 
  • Helps lower cholesterol
Raspberries, Blueberries & Strawberries
  • Flushes toxins
  • Fights inflammation
  • Rich in antioxidants
  • Boosts immune system
  • Fights cancer
Watermelon
  • Flushes toxins
  • Fights inflammation
  • Improves blood flow
  • Boosts immune system
Apple
  • Flushes toxins
  • Aids weight loss
  • Fights cancer
  • Boosts immune system
Cinnamon
  • Revs the metabolism
  • Aids digestion
  • Improves brain function
Mint
  • Aids digestion
  • Eases stomachaches 
  • Fights depression
Basil
  • Flushes toxins
  • Fights inflammation
  • Contains antioxidants 
  • Antibacterial properties
  • Fights depression 
  • Fights cancer
Now that you know the benefits, it’s time to start making these delicious detox water recipes!
* When making detox water it’s important to let it sit in the refrigerator for at least two hours before drinking. This will allow the nutrients to seep into the water. 
* When making detox water, many people recommend not eating the fruit afterwards. While eating the fruit certainly won’t harm you, it may not have the same flavor or pack the same nutritional punch as it did before.

Detox Water Recipes:

All Fruit Detox Water

Apple Cinnamon Detox Water

Grapefruit Detox Water


Green Tea Detox Water with Mint


Kiwi Blueberry Detox Water


Lemon Lime Cucumber Detox Water

Strawberry Kiwi Detox Water

Orange Blueberry Detox Water

Raspberry Lemon Detox Water


Strawberry Lemon Basil Detox Water


Watermelon Detox Water


Enjoy these fantastic recipes! You should be drinking half of your weight in water EVERY day!  With these delicious recipes, that should not be so difficult!


Do you want to join my next FREE fun fitness and clean eating group? Just fill out the below form: